Author: jmin

  • How Smarter Kit Management Improved Efficiency at a Diagnostics Company

    As many commercial diagnostics companies experience, managing kit inventory at clinical practices across the country proves to be a unique and complex logistical challenge.

    If too much inventory is sitting at a given practice, the company’s working capital is tied up in inventory that is not being utilized. Additionally, many diagnostic kits have a shelf life, so if there’s excess inventory, the kits are more likely to end up expiring. That’s a cost the company can’t recover. On the opposite end, a lack of inventory will prevent providers from ordering tests, resulting in a direct revenue impact and providing a bad user experience.

    While working at a molecular diagnostics company, I implemented solutions that helped address these problems by giving the commercial team:

    • The ability to order kits directly from the Salesforce CRM, where they keep track of the rest of their customer interactions.
    • Inventory tracking capabilities at each clinical practice
    • Alerts when kits at a given practice are about to expire
    • The ability to set up kit autoreplenishment for high-volume providers so the sales team does not need to manually order more kits for them.

    The implementation of these features ended up :

    • Reducing the number of blood samples the lab received with expired tubes. Note: expired blood tubes was an immediate rejection at the lab, and the provider would need to redraw blood from the patient.
    • Kept inventory counts across all practices more even, leading to less kits tied up in inventory and less kits expiring.
    • Reduced the likelihood of high-volume providers from running out of test kits.

    Implementing these features presented some technical challenges as it relied on data accuracy within the CRM for the system to work well. For example, how can one possibly determine whether a given kit is still in inventory at a practice or if it is already consumed?

    There are two solutions to this problem. One is integrating the Lab Information Management System (LIMS) with the CRM. As kits get accessioned in LIMS, the kit identifiers get sent into the CRM, thus marking the kits as consumed and reducing the inventory count at the practice. Other advantages of integrating LIMS with Salesforce is giving the commercial team up-to-date information on test result status, keeping track of test order volumes through reports, and allowing for client portals to be built on top of Salesforce Communities.

    If a Salesforce-LIMS integration proves to be too much of a technical challenge, another solution is utilizing FedEx and/or UPS APIs to check if the return tracking label associated with a given kit was shipped or delivered. If so, that is a reasonable proxy for the kit being delivered to the lab and thus, no longer in inventory at the clinical practice.

    There were plenty of other challenges faced along the way like tracking kits moved between practices, dealing with lost kits, and tracking kits that were ordered that have not yet been received at the lab.

    If you are interested in learning and discussing more on these challenges and the solutions implemented, please feel free to contact me at connect@joshuacmin.com.

    Thank you for reading!
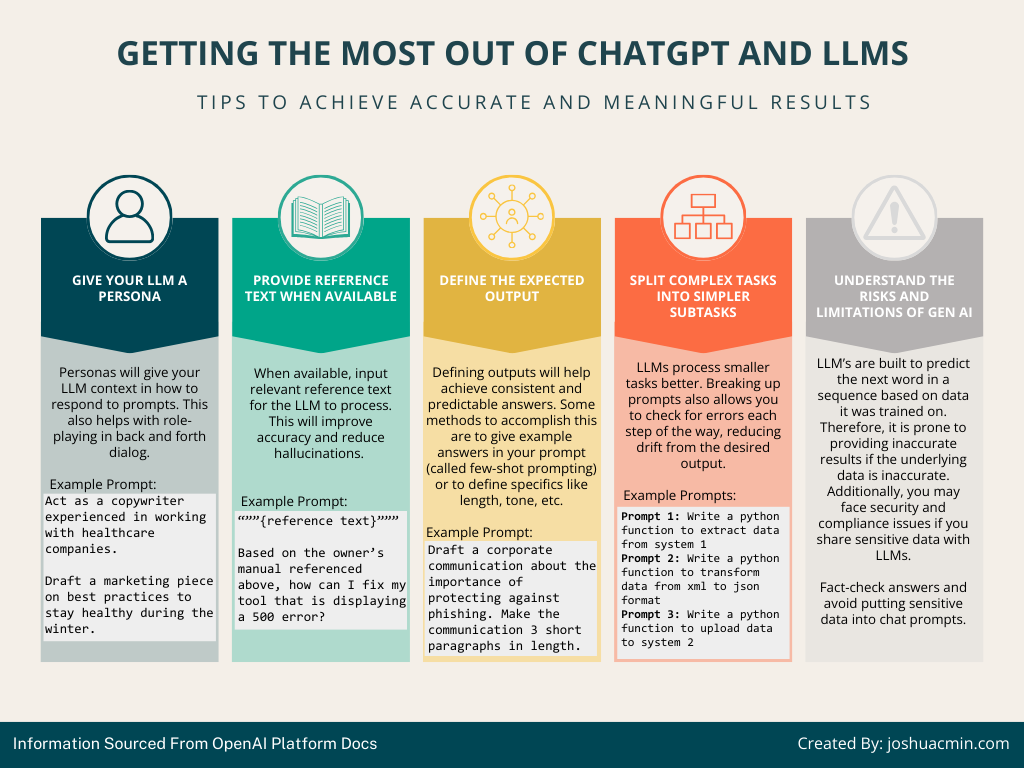
  • Cool Guide on Getting the Most out of ChatGPT and Other LLMs

    As an avid user of ChatGPT, I’ve done extensive research on how to craft prompts to achieve the best results. This helped reduce the amount of hallucinations and errors I get while getting the answers and content I want. However, nothing is bulletproof, so it’s always best to fact-check outputs if it is important to do so.

    I created a nice infographic below to summarize my learnings from digging through the OpenAI documentation, which can be found here.

    At a future date, I will update this post and go into more details on each of the points I’ve made in the infographic.

    If you found this content helpful or if you would like help in generating educational content for your user base, I would love to hear from you. Please reach out at connect@joshuacmin.com.

  • How I Built saveandcompound.com, a Budget-Friendly React App Hosted on AWS

    If you noticed a common theme in my posts, I am interested in personal finance and investing. One concept I’ve been particularly fascinated about is the power of compounding. Therefore, I created a simple app to show the powerful effects of how compounded returns over time can turn small savings into big money. You can view it here at https://saveandcompound.com.

    The great thing about this app is that since the files are hosted on AWS S3, I am spending next to nothing (other than for the domain) to host this website. The savings in not provisioning a web server is sure to compound over time! If only I had an app to calculate that…

    How I Built This App

    I was inspired by the Spend Bill Gates Money website and found that the code was open-sourced. The repository can be found here. I cloned the repository and modified the code so that instead of calculating how much of Bill Gates’ money you spent, it calculates how much you can save over X amount of years if you cut out certain expenses and invested the savings at a Y% ROI.

    After testing out the app on my local computer, I set up github actions to:

    1. Deploy AWS Infrastructure via Terraform
    2. Build the react app from the source code and upload it to AWS S3

    Architecture

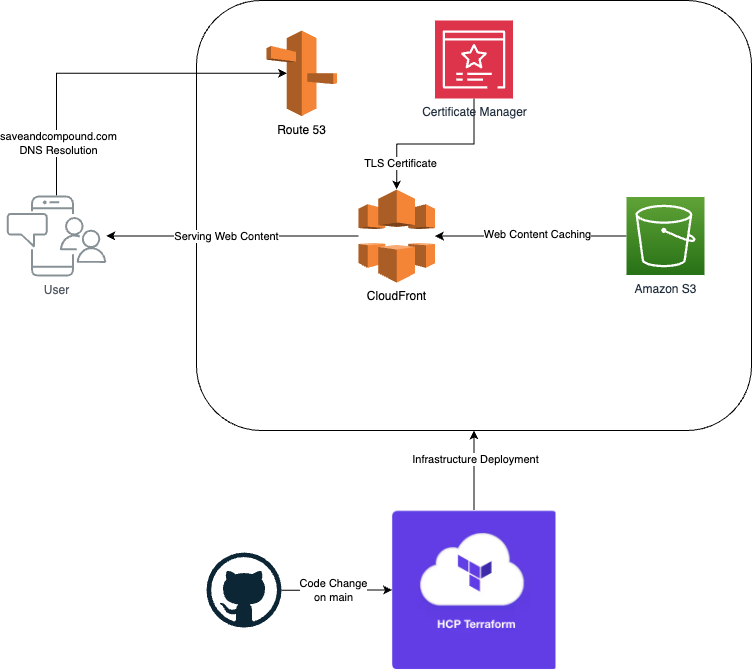
    Overall, the architecture looks like below:

    Just like my previous valuepilotai.com project, code and infrastructure changes are deployed by github actions and Terraform. Here is a breakdown of the infrastructure set up within AWS:

    • Route 53: The saveandcompound.com domain name was registered within Route 53. Additionally, the hosted zone contains the DNS entries required to resolve saveandcompound.com to the CloudFront distribution.
    • Certificate Manager: The TLS certificate is provisioned within Certificate Manager. This is used by the CloudFront distribution to secure connections between clients and the CloudFront distribution.
    • CloudFront: CloudFront serves the build files to the web clients. The reasons for using CloudFront instead of having S3 serve files are to allow for a secure TLS connection with web clients, reduce latency of serving files, and reduce the number of requests to S3 (although this point is negligible for low-volume apps).
    • S3: S3 hosts all the build files for the React app.

    If you are interested in learning more about the simple app I created, feel free to email me at connect@joshuacmin.com. Thanks for reading!

  • Setting up a Professional-Looking Email Address with a Custom Domain for Free (Well, Almost Free)

    When I was creating this website, I wanted to publish an email address for readers to contact me. However, I did not want to spend money on an email service provider like Google Workspace, publish my personal email for the world to see, or create another *@gmail.com account. Rather, I wanted a professional-looking email using a custom domain at a cheap (or free) price.

    After some research, I came across a product called Zoho that fit my needs. Zoho is an all-in-one software as a service (SaaS) platform for small businesses, and an email service is part of their suite. The features I needed from their email service was included in their free version. Note, I am not affiliated with Zoho nor am I getting paid to talk about them.

    I proceeded setting up my email account so I can send and receive emails from connect@joshuacmin.com. After completing the setup, I realized unless you are an IT professional, the DNS record setup may look foreign and confusing. Therefore, I wanted to explain why these DNS records are required and give general instructions on how to set up the DNS records. That way, anyone can confidently set up a professional-looking email address at no cost (except for domain registration and hosting fees).

    Purchasing Your Domain

    I personally use AWS to register and host domains, but it’s not the cheapest. Some other popular places to register a domain are Bluehost, Namecheap, and Cloudflare. Namecheap looks to be the cheapest if that is your priority. So the first step is to pick a domain registrar, sign up for the services, and start searching for an available domain.

    Once you find a domain name that you like and is available, register it! Congratulations, you are now the proud owner of a new domain.

    Signing Up for Zoho (or another mail provider)

    I won’t go into too much detail for this step, but you can sign up for Zoho Mail here. I want to reiterate I have no affiliation with Zoho; I just found their product was free and sufficient for my current needs. If you decide to use another email provider, the steps for setting up DNS records remain generally the same.

    Setting Up DNS Records for Email

    Once you sign up for Zoho mail, you’ll be bombarded with requests for creating DNS records for your newly purchased domain. Before going through how to create these DNS records, I will walk you through what each DNS record is used for.

    Walking Through Each DNS Record

    Domain Verification: The email hosting provider will need to verify if you own the domain before creating an email account. This prevents people from creating fraudulent email accounts. After all, email hosting providers have a reputation to maintain, and they do not want their mail servers to be blacklisted. Domain verification records are typically TXT records but they can occasionally be CNAMEs. If you don’t know what that means, a TXT record is just like a note on your domain while a CNAME maps a domain or subdomain to another domain.

    MX Records: MX Records tell email other email hosts if I want to send an email to *@joshuacmin.com, where do I need to send the email to? Therefore, setting up MX records is required for receiving emails to your business email address.

    The next three DNS records are related to email authentication. What does that mean? I’ll explain with an example.

    When you receive an email from tim.cook@apple.com, how can you or your email server know that it was actually sent from apple.com and not some hacker pretending to be Tim Apple? This is where SPF, DKIM, and DMARC records come into play. The combination of these three records help prevent fraud and impersonation in the email world. Setting up these records is not only best practice for security but is also very important for email deliverability. Google recently came out with new rules that they will reject emails from domains that don’t have email authentication implemented.

    SPF Record: The SPF record on a domain specifies who are authorized senders for a domain address. To some extent, it tells email servers who are authorized senders of *@joshuacmin.com emails. If you receive an email sent by connect@joshuacmin.com that originated from Zoho mail servers and the SPF record specifies that Zoho mail servers are authorized senders, then you can be confident the email is legitimate. The SPF record is a TXT record on the domain and can specify multiple authorized sender addresses. Sender addresses can be domains or IP addresses.

    DKIM Record: The DKIM record on a domain is a public key used to determine if an email is cryptographically signed by a mail server with the correct private key. This helps not only verify the email is signed by a legitimate party but also prevents tampering of the email contents itself. I won’t get into the details of how it works, but it’s another effective method to prove legitimacy of the email . the DKIM record is a TXT record on the domain with an optional “DKIM selector” in case there are multiple mail servers that need to send emails using different private keys (like if you have an email marketing tool that is separate from your normal business email servers).

    DMARC Record: The DMARC record specifies how email servers should handle emails that don’t pass both the DKIM and SPF tests. Typically, you’d want to set this record so that if both SPF and DKIM fails, the email servers reject the email. This will prevent fraudulent emails from making it to client inboxes. The DMARC record is a TXT record.

    Creating DNS Records

    Now that you have an idea of why we need to set up DNS records, you’ll need to know where you can enter these records. The values are all obtained from your email hosting provider (like Zoho), while the values are generally entered at the same site you registered your domain. When you click into your registered domain, you should generally see a section where you can enter DNS records.

    Thanks for taking the time to read my post! If you have any questions or would like help setting up DNS records or email security, please feel free to reach out at connect@joshuacmin.com.

  • Creating a GPT-Powered Value Investing Web App

    I have been reading up on Value Investing lately and trying to become the next Warren Buffet. I quickly realized analyzing a company for investment potential is difficult. As a newbie, reading 10-K annual reports is overwhelming and takes forever, especially since I don’t know what I should be looking for. Additionally, looking at numbers don’t tell the whole story. If it was that easy, everyone would be good at investing and in turn, no one would be good. Therefore, I developed a tool to help me with my stock research and also give me an excuse to learn some new things.

    Thus, www.valuepilotai.com was born.

    Value Pilot AI helps users take a first pass at evaluating a stock by providing historical financial data (with basic charting), ChatGPT-generated summaries of the 10k filing, and key financial ratios along with context regarding these ratios. The app serves to provide an overview of the company and its market landscape and some context behind its numbers. All without taking a deep dive into their 10-K annual report. If a company looks promising based on my first pass using the app, I take a deeper dive into their SEC filings and other secondary sources of information.

    As of this blog post, there are no valuation metrics available in the app, but this will be a future development.

    How I Built the App

    With the first iteration of this project, I successfully:

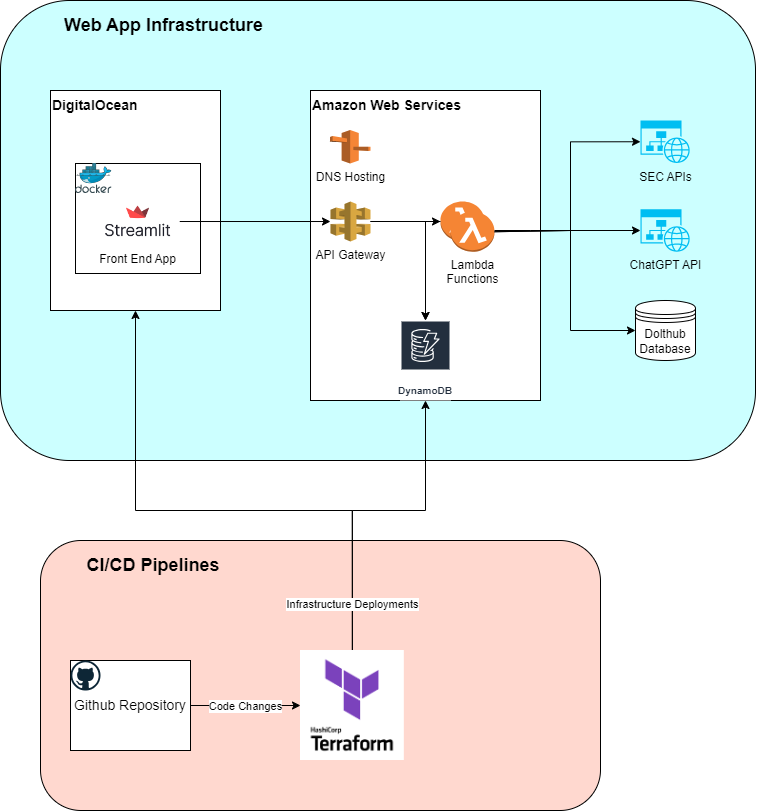
    • Created and deployed API infrastructure using Terraform. In AWS, I used API gateway, DynamoDB, and Lambda Functions.
    • Created a front-end app using Streamlit.
    • Utilized Docker to simplify deployment of the Streamlit app on DigitalOcean.
    • Used Github actions to deploy changes to both the frontend and backend whenever code changes are committed to the main branch.

    The main programming languages used to build this app were Python and HashiCorp Configuration Language (HCL). Python was used to program the streamlit app as well as the AWS Lambda Functions that retrieved/stored data from the SEC website, ChatGPT, Dolthub, and DynamoDB. HCL was used to configure and deploy all the AWS infrastructure tied to the app. The beauty of using Terraform is that if I needed to tear down and redeploy this app into a new account, it just takes a couple button clicks!

    If you’re more of a visual person, check out the architecture diagram below to see at a high level how it all works.

    I’m saving on costs given this infrastructure is “serverless”. The only fixed costs are for this app are the DNS hosting ($14/year for registration plus ~$0.50/mo for the hosted zone) and the frontend app hosting (~$5/mo).

    If you have any questions, comments, or feedback, please don’t hesitate to reach out to me at connect@joshuacmin.com. I’m always looking to learn and improve.

    I’m also happy to discuss any needs on your projects I can help with.

  • Creating a Simple Website on a Budget

    Static website hosted on Amazon Simple Storage Service (S3)

    NOTE: I have since migrated my website onto WordPress. Updating static pages was getting unwieldy, and I wanted to focus on content rather than website building. Therefore, this article does not reflect how this current website is built.

    I’ve spent quite a bit of time thinking about how I wanted to deploy this website. Given I have little to no web development experience and wanted to keep costs minimal, I downloaded a premade front-end web template, edited the html pages and a bit of the javascript code, and uploaded it to Amazon S3. Some of the key features I implemented was SSL encryption and an API for the Contact Me form to post data to a database and notify me of the new message via e-mail.

    Architecture
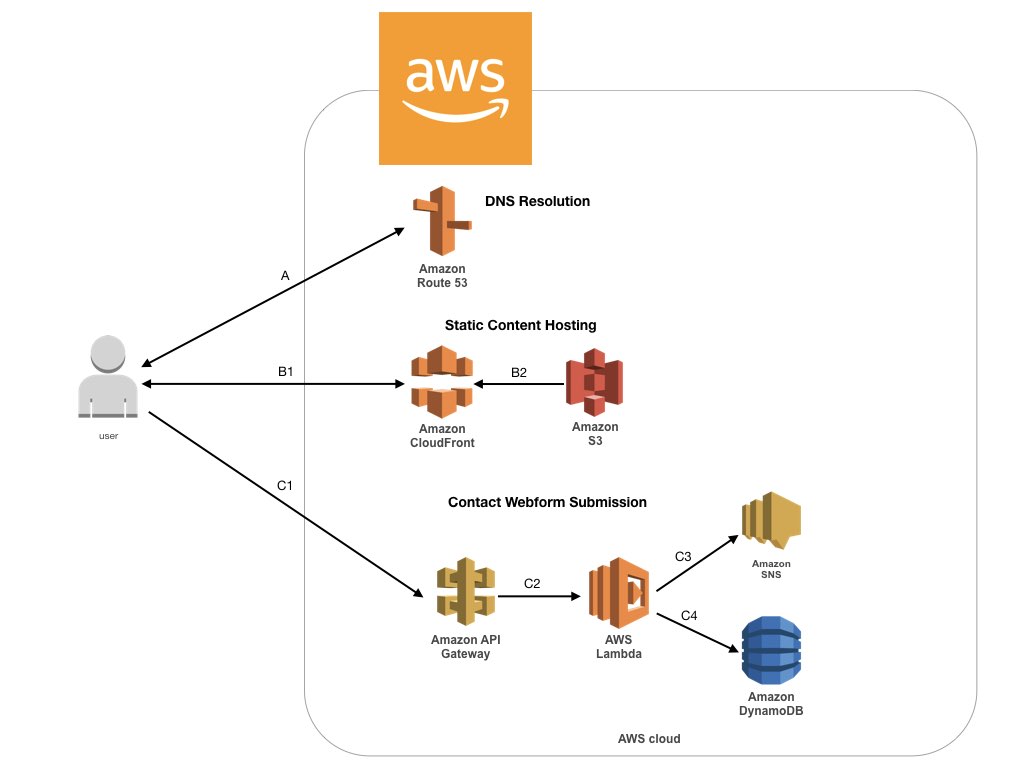
    Below is an architecture diagram showing the services I used for this website.

    A: DNS Resolution
    I used Route 53, which is AWS’s DNS service. Within Route 53, I purchased my domain name and set up alias records to redirect users to to the CloudFront Distribution when they perform a DNS lookup for joshuacmin.com or www.joshuacmin.com.

    B: Static Content Hosting
    For static content hosting, I used CloudFront and S3. Cloudfront is a content delivery network, which serves content to end users quickly and securely. Cloudfront allows for a SSL connection to be made between the end user and AWS infrastructure, which was the key reason I decided to use it. Amazon S3, or Simple Storage Service, stores all of my static content with high durability and availability. Whenever a web request comes in, CloudFront pulls the objects from Amazon S3 and serves it to the end user. It also caches objects for 24 hours, reducing latency and the need to constantly pull files from S3.

    C: Contact Webform Submission
    The contact page of the website has a form where users can submit data. Setting this up took quite a bit of work as it required API Gateway, Lambda, DynamoDB, and SNS. API gateway provides an endpoint for users to post data. From there, a Lambda function is invoked. The Lambda function stores the posted data into DynamoDB, a NoSQL database, and publishes a message to Simple Notification Service (SNS). SNS then sends an email to notify me of a new message.

    Cost

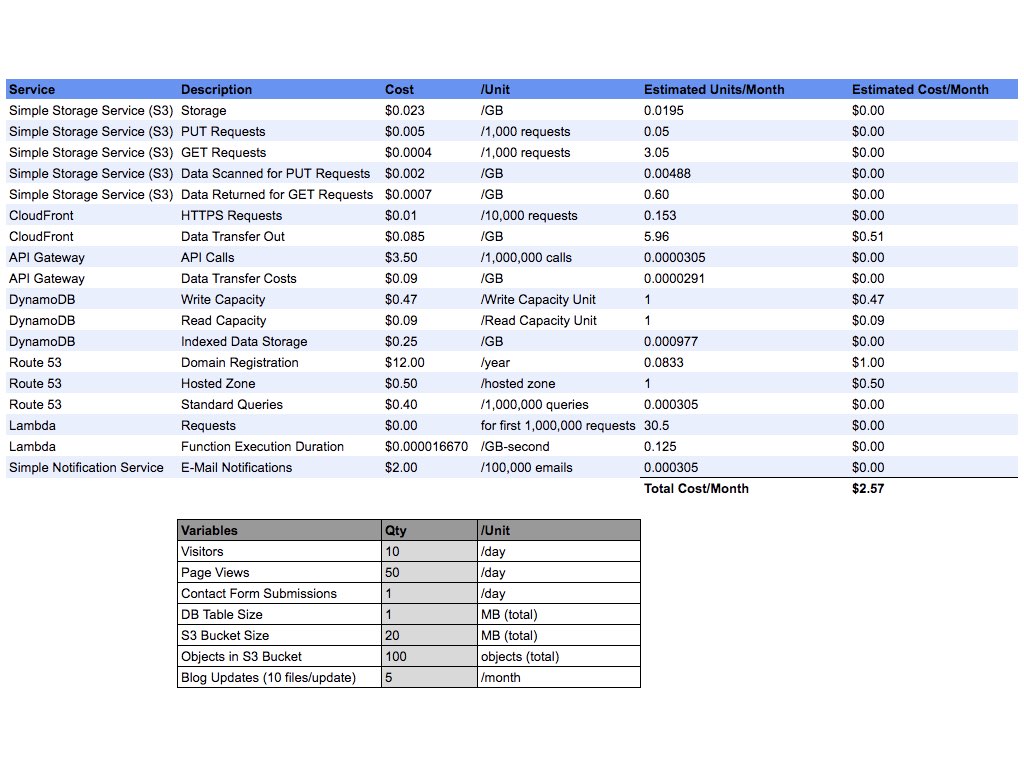
    I mentioned before that cost is one of the key constraints for this project. Therefore, I developed a cost estimate spreadsheet for hosting the website on AWS.

    You can see above that although relatively cheap (even cheaper in free tier), the AWS pricing structure is complicated. For a simple static website, there are 18 different line items to account for! I guess I encountered one of the pitfalls of cloud computing pretty early on. I also noticed that the CloudFront Data Transfer Out line item will incur a high cost if there is an increase in number of users. This made me realize the importance of minimizing file sizes to control costs.

    Implementation

    I will publish the implementation details on GitHub and post the link here shortly. Stay Tuned!

    Closing Remarks

    Currently, my website is pretty simple, and I could certainly optimize many things. However, I view this as a work in progress and hope to provide more features and better content over time. As always, I am open to feedback anyone has.