Category: AWS

  • How I Built saveandcompound.com, a Budget-Friendly React App Hosted on AWS

    If you noticed a common theme in my posts, I am interested in personal finance and investing. One concept I’ve been particularly fascinated about is the power of compounding. Therefore, I created a simple app to show the powerful effects of how compounded returns over time can turn small savings into big money. You can view it here at https://saveandcompound.com.

    The great thing about this app is that since the files are hosted on AWS S3, I am spending next to nothing (other than for the domain) to host this website. The savings in not provisioning a web server is sure to compound over time! If only I had an app to calculate that…

    How I Built This App

    I was inspired by the Spend Bill Gates Money website and found that the code was open-sourced. The repository can be found here. I cloned the repository and modified the code so that instead of calculating how much of Bill Gates’ money you spent, it calculates how much you can save over X amount of years if you cut out certain expenses and invested the savings at a Y% ROI.

    After testing out the app on my local computer, I set up github actions to:

    1. Deploy AWS Infrastructure via Terraform
    2. Build the react app from the source code and upload it to AWS S3
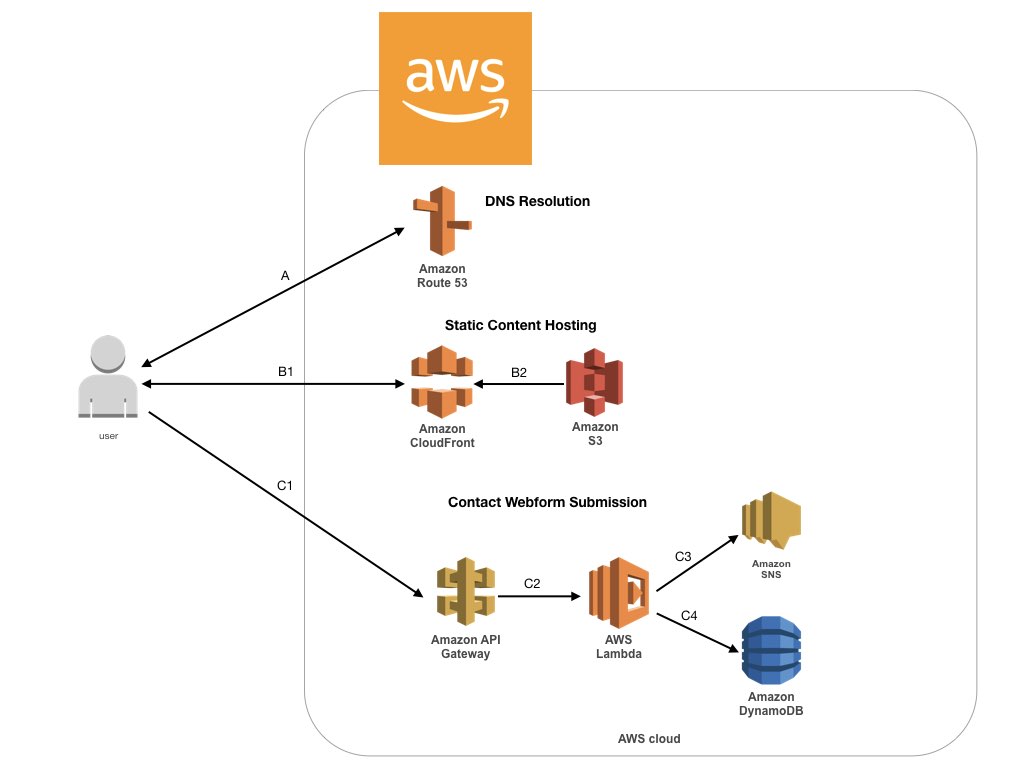
    Architecture

    Overall, the architecture looks like below:

    Just like my previous valuepilotai.com project, code and infrastructure changes are deployed by github actions and Terraform. Here is a breakdown of the infrastructure set up within AWS:

    • Route 53: The saveandcompound.com domain name was registered within Route 53. Additionally, the hosted zone contains the DNS entries required to resolve saveandcompound.com to the CloudFront distribution.
    • Certificate Manager: The TLS certificate is provisioned within Certificate Manager. This is used by the CloudFront distribution to secure connections between clients and the CloudFront distribution.
    • CloudFront: CloudFront serves the build files to the web clients. The reasons for using CloudFront instead of having S3 serve files are to allow for a secure TLS connection with web clients, reduce latency of serving files, and reduce the number of requests to S3 (although this point is negligible for low-volume apps).
    • S3: S3 hosts all the build files for the React app.

    If you are interested in learning more about the simple app I created, feel free to email me at connect@joshuacmin.com. Thanks for reading!

  • Creating a GPT-Powered Value Investing Web App

    I have been reading up on Value Investing lately and trying to become the next Warren Buffet. I quickly realized analyzing a company for investment potential is difficult. As a newbie, reading 10-K annual reports is overwhelming and takes forever, especially since I don’t know what I should be looking for. Additionally, looking at numbers don’t tell the whole story. If it was that easy, everyone would be good at investing and in turn, no one would be good. Therefore, I developed a tool to help me with my stock research and also give me an excuse to learn some new things.

    Thus, www.valuepilotai.com was born.

    Value Pilot AI helps users take a first pass at evaluating a stock by providing historical financial data (with basic charting), ChatGPT-generated summaries of the 10k filing, and key financial ratios along with context regarding these ratios. The app serves to provide an overview of the company and its market landscape and some context behind its numbers. All without taking a deep dive into their 10-K annual report. If a company looks promising based on my first pass using the app, I take a deeper dive into their SEC filings and other secondary sources of information.

    As of this blog post, there are no valuation metrics available in the app, but this will be a future development.

    How I Built the App

    With the first iteration of this project, I successfully:

    • Created and deployed API infrastructure using Terraform. In AWS, I used API gateway, DynamoDB, and Lambda Functions.
    • Created a front-end app using Streamlit.
    • Utilized Docker to simplify deployment of the Streamlit app on DigitalOcean.
    • Used Github actions to deploy changes to both the frontend and backend whenever code changes are committed to the main branch.

    The main programming languages used to build this app were Python and HashiCorp Configuration Language (HCL). Python was used to program the streamlit app as well as the AWS Lambda Functions that retrieved/stored data from the SEC website, ChatGPT, Dolthub, and DynamoDB. HCL was used to configure and deploy all the AWS infrastructure tied to the app. The beauty of using Terraform is that if I needed to tear down and redeploy this app into a new account, it just takes a couple button clicks!

    If you’re more of a visual person, check out the architecture diagram below to see at a high level how it all works.

    I’m saving on costs given this infrastructure is “serverless”. The only fixed costs are for this app are the DNS hosting ($14/year for registration plus ~$0.50/mo for the hosted zone) and the frontend app hosting (~$5/mo).

    If you have any questions, comments, or feedback, please don’t hesitate to reach out to me at connect@joshuacmin.com. I’m always looking to learn and improve.

    I’m also happy to discuss any needs on your projects I can help with.

  • Creating a Simple Website on a Budget

    Static website hosted on Amazon Simple Storage Service (S3)

    NOTE: I have since migrated my website onto WordPress. Updating static pages was getting unwieldy, and I wanted to focus on content rather than website building. Therefore, this article does not reflect how this current website is built.

    I’ve spent quite a bit of time thinking about how I wanted to deploy this website. Given I have little to no web development experience and wanted to keep costs minimal, I downloaded a premade front-end web template, edited the html pages and a bit of the javascript code, and uploaded it to Amazon S3. Some of the key features I implemented was SSL encryption and an API for the Contact Me form to post data to a database and notify me of the new message via e-mail.

    Architecture
    Below is an architecture diagram showing the services I used for this website.

    A: DNS Resolution
    I used Route 53, which is AWS’s DNS service. Within Route 53, I purchased my domain name and set up alias records to redirect users to to the CloudFront Distribution when they perform a DNS lookup for joshuacmin.com or www.joshuacmin.com.

    B: Static Content Hosting
    For static content hosting, I used CloudFront and S3. Cloudfront is a content delivery network, which serves content to end users quickly and securely. Cloudfront allows for a SSL connection to be made between the end user and AWS infrastructure, which was the key reason I decided to use it. Amazon S3, or Simple Storage Service, stores all of my static content with high durability and availability. Whenever a web request comes in, CloudFront pulls the objects from Amazon S3 and serves it to the end user. It also caches objects for 24 hours, reducing latency and the need to constantly pull files from S3.

    C: Contact Webform Submission
    The contact page of the website has a form where users can submit data. Setting this up took quite a bit of work as it required API Gateway, Lambda, DynamoDB, and SNS. API gateway provides an endpoint for users to post data. From there, a Lambda function is invoked. The Lambda function stores the posted data into DynamoDB, a NoSQL database, and publishes a message to Simple Notification Service (SNS). SNS then sends an email to notify me of a new message.

    Cost

    I mentioned before that cost is one of the key constraints for this project. Therefore, I developed a cost estimate spreadsheet for hosting the website on AWS.

    You can see above that although relatively cheap (even cheaper in free tier), the AWS pricing structure is complicated. For a simple static website, there are 18 different line items to account for! I guess I encountered one of the pitfalls of cloud computing pretty early on. I also noticed that the CloudFront Data Transfer Out line item will incur a high cost if there is an increase in number of users. This made me realize the importance of minimizing file sizes to control costs.

    Implementation

    I will publish the implementation details on GitHub and post the link here shortly. Stay Tuned!

    Closing Remarks

    Currently, my website is pretty simple, and I could certainly optimize many things. However, I view this as a work in progress and hope to provide more features and better content over time. As always, I am open to feedback anyone has.